
Car audio Fabrication
Car audio Fabrication
Over a year ago, I started this journey of building a competition grade car audio install. The car starts with a powerful and sporty Maserati Quattroporte GTS V8. I started small with one amplifier and a subwoofer. Soon I realized I don’t relish just a thumping bass and no room for clear mids and lows. Add to that the streaming provided by a car’s stock audio played does not stream a lossless bluetooth 5.0. Although your phone (in my case IPhone) supports lossless, your car audio receiver compresses the music. This renders the actual lows and certain frequencies that the artist recorded but was not rendered. This drove me to build an advanced system.
This whole system was built of Audison bit amplifiers, Hertz speakers, and JL Audio subwoofers.
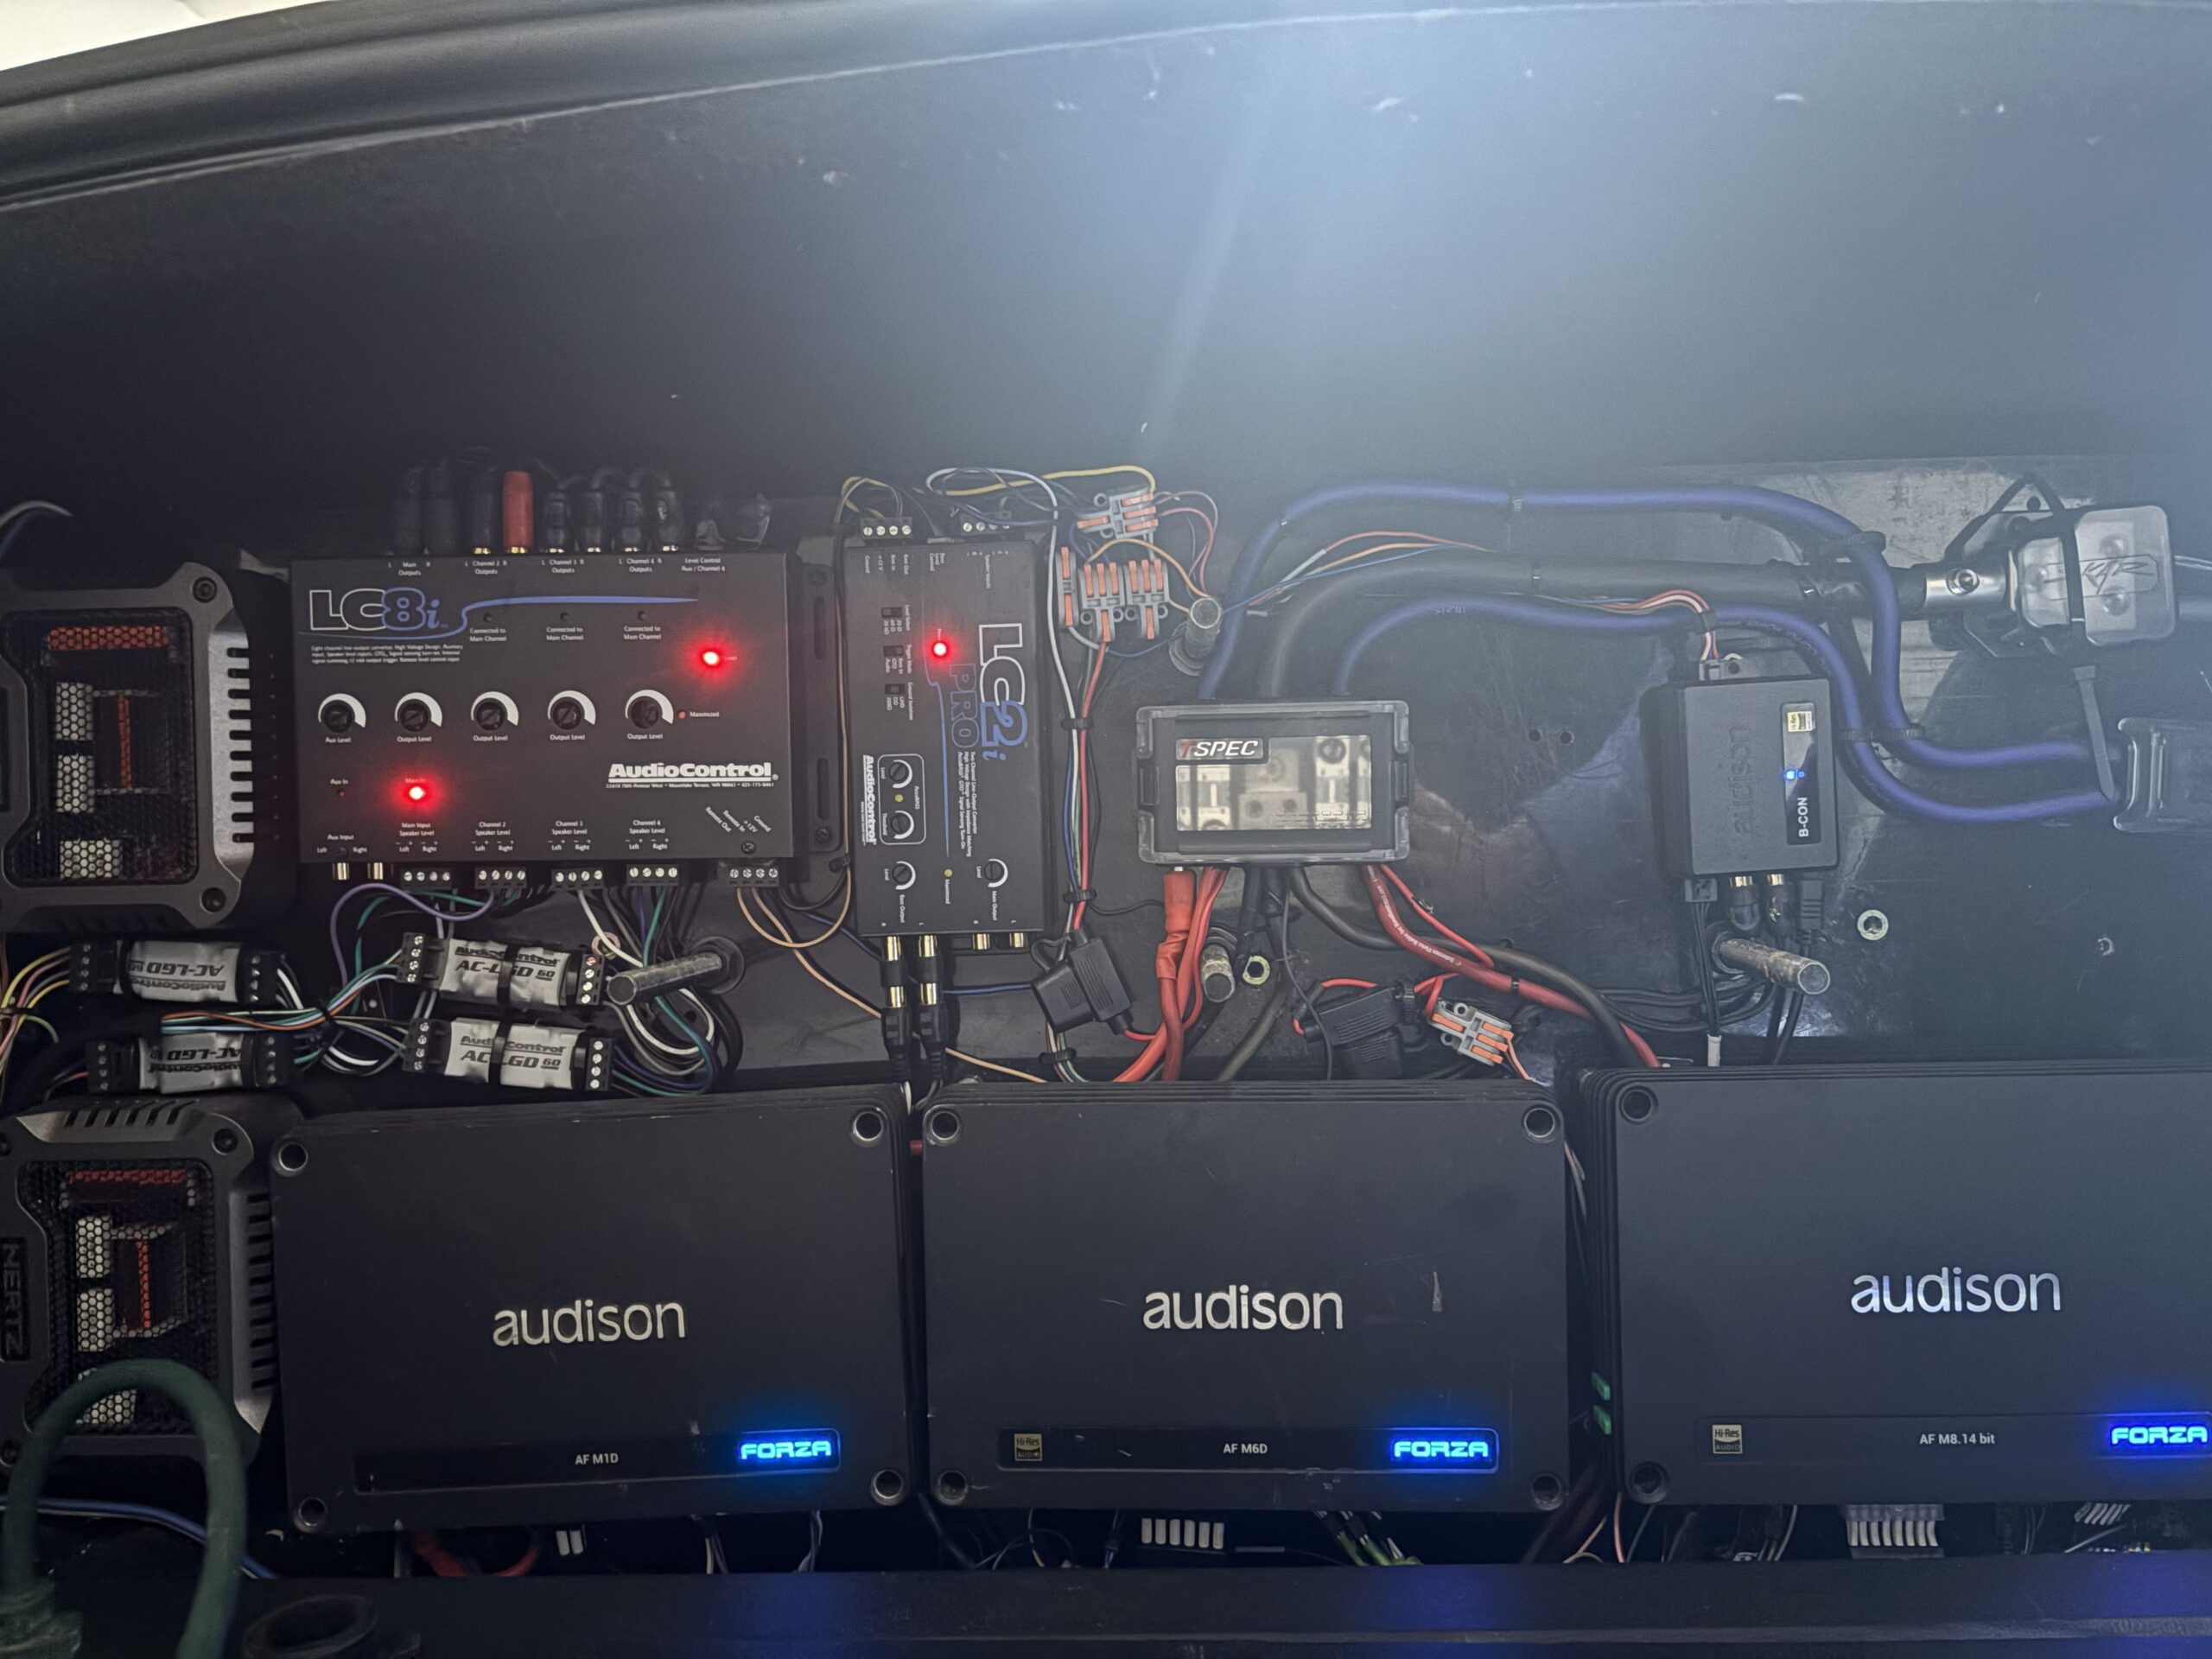
There are 3 amplifiers. Audison Forza AFM 8.14 DSP amplifier, Audison AFM6D companion amplifier, Audison Forza AFM1D monoblock Amplifier. I will not get into the specs of these amplifiers here.
Let’s start with the process. It features an Audison Forza AFM 8.14 bit drive amplifier. This amplifier has 14 channels of DSP and 8 channels of amplification at 90W RMS per channel. The companion Audison Forza AFM6D has 6 channels of amplification with the DSP provided from the AFM 8.14 bit drive amplifier. The Audison Forza monoblock AFM1D provides 600W of RMS and 1000W peak output.
Now we get to the muscle. The speakers are from Hertz. We start with the mid-bass. The 4 doors are equipped with the Hertz Mille Legend 1650.3 speakers. The mids are provided with Hertz Mille Legend 700.3 . The mids are on the front 2 doors and the rear panel shelf. The tweeters are powered by Hertz Mille Legend 280.3 . The tweeters are on the front dash and rear doors. So far, we covered the left and the right. We then come to the center. The front center has Hertz Mille Pro 70.3 for mid and Hertz Mille Pro 28.3 for the tweeters. The rear had a little more room, as it was originally equipped with a 10-inch stock Pioneer subwoofer. I fit this space with the Hertz Mille Pro 165.3 mid-woofer. Hertz 70.3 for the mid and Hertz 28.3 for the tweeters. We are left with the subwoofers. I have a 10-inch JL Audio ported subwoofer behind the rear seat in the trunk and another 10-inch ported subwoofer in the spare tire. If you’re guessing, yes, I removed the spare tire. We have roadside assistance. This car doesn’t leave the city.
So far, we have covered the amplifiers, speakers, and subwoofers. Next we cover sizing and distribution. Not all are utilizing the same power. The subwoofers and mid-base need more power., Also, if you had kept track of speaker count and amplifier channels, they don’t match. So I had to drive 12 channels active and 2 channels passive. Which gets what is what we cover next. Here’s the math behind it. Not so complicated. The mid range and tweeters are spec’ed at 90W RMS, which matches the provided 90W RMS from the Audison AFM 8.14 DSP amplifier. The midwoofers are spec’d at 125 W RMS per speaker. This was paired with the companion Audison AFM6D rated at 135 W per channel for a total of 6 channels of amplification. That leaves us with the front and rear center channels. The front center has two speakers and the rear center has 3 speakers. Since we have only 2 channels of amplification left, we utilize a Hertz 3-way passive crossover. For this, we went with the Hertz MPCX 3.3 for the front and rear center channels.
Thus far, we have covered the brain and the muscle. Now we get to the central Nervous system that supports the conduction. Don’t mean to sound like a Doc, but I drive this analogy from the human system. It helps me to visualize the workflow. The stock speaker wires didn’t seem adequate to me to drive all this power efficiently down to the speakers. I decided to perform an open surgery here. I ran 14 AWG pure OFC copper wire to all the peripheral nodes. They all meet back to the Audison amplifier distribution. This is one area I had mixed reviews. Should you run new wires and how? It cost me dearly, well over a couple of months. I would not recommend this for an install. I did this so I can build a complete demo of every detail you can think of in custom car audio fabrication. Now, where were we?. New speaker wires are run to all the speakers. The central wire system doesn’t end there. All this configuration takes at least 2000+ watts of power. The stock battery and alternator is not designed for this. Even if it were, we want to isolate the car’s performance from pleasure. So we need a separate battery to power this. We go with a Group48 battery. This battery needs a distribution box for all the amplifiers. I have designed a 2-stage distribution box. Initially, 0 AWG wire from the primary battery to the first distribution box. The 2 4 AWG wires run from the first distribution box to the second distribution box. From the second distribution box, we have 3 sets of 8 AWG wires running to the amplifiers. We also ran 4 pairs of 16 AWG power wires for smaller peripherals.
Now that we have covered the amplifiers, speakers, and the battery, we need to figure out how to feed this daily. If we have only one battery, we can depend on the car’s alternator to charge it. Since we added a secondary battery, it now takes us to the BMS ( Battery Management system). For this, I added a NOCO Boost Genius 20 A dual battery charger. I connected both the batteries to the noco Genius Boost to charge the battery externally. This charger charges both the batteries, and you are also able to tell the useful life left in them before another charge. The beauty of this charger is you dont have to worry about overcharging. You can play music all year long and keep it charging and not have to start your car at all. OK, enough said in the introduction about BMS; we shall move on to the next phase of powering all these amplifiers. Since we connected all the amplifiers and peripherals to the secondary battery, they dont know when to shut off. They turn on the detection of a 12V trigger, which , in this case, is available all year round. We need to connect this battery to the cars primary battery for 2 reasons. One , we can charge the secondary battery from a cars alternator, and secondly, we can kill the power to the amplifiers from the secondary battery by adding a trigger from the primary batteries fuse box. Since the car is already wired to turn on and off devices when it is keyed in, we tap into the same trigger for this battery. Now that we are communicating between the 2 batteries, we have to be very careful. We have to add 2 solenoids and multiple fuses. We start by adding a 150 A fuse between the primary battery and secondary battery. In case of a short, we kill the communication between the two batteries. First, for this purpose, we place this fuse close to the primary battery within 1-2 feet. Next , we add a solenoid rated at 150 Amp to make / break power connection between the two batteries. Now we add another fuse on the other end of the solenoid closer to the secondary battery. What we have achieved is connecting the 2 batteries. So far, I hope you are following with me. If you notice, we still havent added a kill switch to the secondary battery. We add another solenoid – in this case, I went with a 200A solenoid. This solenoid will connect the secondary battery to the amplifiers through this solenoid. This is the kill switch for the custom audio rack. As usual, add a similar rated fuse before and after the solenoid to protect the batteries and devices. Solenoids are a fancy word for a switch. You provide a small current to make or break a large circuit, similar to your house light/fan. The difference is it is rated for industrial strength. We power these 2 solenoids we put in place by connecting the trigger 12 v from the cars fuse box. Bam. We took care of disconnecting the power on car ignition switch. I experimented a lot with this to write in a paragraph. Now that we have thich 4 GA and 0 GA wires running between 2 batteries and the amplifiers , we need to be careful about touching any part of the positive to the car chassis. It will short out the car. Rember all the ground is terminated to the cars chassis( any unpainted body of the car).
We have a frankenstein. Now it needs a soul. For this, I added a Audison BCon bluetooth streaming device to stream music fro the like of spotify, apple music , amazon music( I’m sure there are a lot more) from my phone to the audison bcon. This takes one of the peripheral 16 awg power source I spoke about earlier(remember). This disconnects our phone from the cars carplay, and we connect to this bluetooth streaming device. Todays cars headunit dont just play music. We use hands free calling , chimes for backup cameras, chimes for seat belt. THis list is on and on, beyond the scope here. Point being, we just cant bypass all car sound. We only stream music elsewhere, since we use bluetooth 5.0 and an optical fiber connection to the amplifiers. Your phone can connect to multiple bluetooth devices at once. We connect to the car for phone,nav etc . We connect to audison bcon for music streaming. In the bluetooth world, they have 2 specs . One is the HFP( hands free profile). This is what we use to connect our phone calls and phone maps to the car. We have another profile( forgot at the time of this writing what it is called) for music. We use this profile for the phone to pair to the audison bcon. I split open the factory speaker in and out wires . First lets cover the out since its easy. Remember, I ran new 14 AWG OFC copper wires for the new speakers . So the factory out is pretty much labelled and capped. Except the center channel. I found it cumbersome to run new wires for the front center. So i retain the front center( mid and tweeter to OOB). We move on to the other end of the splice. We have 16 pairs of amplified high signal coming from the factory amp. These wires contain the data of all factory radio audio, chimes, and phone calls. I connected this to the Audiocontrol LC8i speaker level inputs. So this takes 8 inputs. Remember, I have 16 outs from the factory amplifier. I carefully select the channels I want to feed to the LC8i. It should encompass a full bandwidth (from low to high and Left and right). I use 4 for the left and 4 for the right. Out of the 4 that I split for the left and right, I split it it to twitter, mid trange, and mid bass. Repeat this for the right.
Now we move on to the sub woofers. We have 2 moved ported 10 inch subwoofers. We power these with the Audison forza AFM1D monoblock amplifier. We have a bit of a situation here. I have already utilized all the 14 channels of DSP provided by the Audison AFM8.14 for the speakers discussed earlier. Luckily, the Audison BCon has 2 simultaneous outputs- optic fiber and RCA . I was able to use a RCA to pigtail and extract the music output from the bcon streamer out to the audison AFM1D. I placed an audiocontrol LC2i LOC between the bcon and the Audison AFM1D monoblock. Technically, you can feed toe bcon speaker level output directly to the Audison AFM1D, but I have a audiocontrol ACR1 dash control volume knob wired previously. I wanted to make use of this. Since the master volume control for the Audison M8.14 doesnt talk to the Audison AFM1D monoblock. The subwoofer volume gain control is now under the mini glove box under the steering wheel. I also have a similar Audiocontrol ACR3 volume knob stacked for the Audiocontrol LC8i for the factory radio volume control.
Lets do a quick recap of what we have so far. We have covered the Amplifiers, speakers Battery management System and Subwoofers.
Now its time to power on everything and do a light and sound check. Every thing was blinking and sounding at the right places(after 100 corrections and tweaks).
All sounds good fromm the Audison BCon streamer. However, I didnt have any sound from my factory sound. For a couple of months, I was driving without by backup sensors beeping or my phone calls on my new system. Heres what I learnt. When you add aftermarket speakers and add an Audiocontrol LOC, the factory system does not detect factory speakers in its output, so it shuts down the input signal; hence, no sound. To fix this, You hae to add 4 load generator resistors, especially for high end systems like the maserati quattroporte. This tricks the factory system to think there are speakers attached by showing load. There is much more it does. I will not detail here. That took care of the issue of factory sound.
At this time, light and sound checked out. Whats left is the beauty to place this and add a touch of detail. So I started the Fabrication process of the trunk.
This is where the name of my company was formed. Lightnsoundfab.com. There’s a story behind the name.
Let the fab begin. I will quickly shut this topic down for now and go to the end. It will take months to talk about this.
I would like to thank some incredible people with great knowledge on caraudiofabrication. I want to thank Mark from CaraudioFabrication. His videos have inspired me and given me a direction on how to go about this.
At this point, I have a mobile showroom where you can experience the music and talk over coffee about what you want to do.
Open for business
This whole system was built of Audison bit amplifiers, Hertz speakers and JL Audio subwoofers.
There are 3 amplifiers. Audison Forza AFM 8.14 DSP amplifier, Audison AFM6D companion amplifier and an Audison Forza AFM1D monoblock Amplifier. I will not bore with the detail of the specs of these amplifiers here.
Lets start with the brain of it all. It features an Audison Forza AFM 8.14 bit drive amplifier. This amplifier has 14 channels of DSP and 8 channels of amplification at 90W RMS per channel. The companion Audison Forza AFM6D has 6 channels of amplification with the DSP provided from the AFM 8.14 bit drive amplifier. The Audison forza monoblock AFM1D provides 600W of RMS and 1000W peak output.
Now we get to the muscle. The speakers are from Hertz. We start with the mid bass. The 4 doors are equipped with the Hertz mille Legend 1650.3 speakers. The mids are provided with Hertz Mille Legend 700.3 . The mids are on the front 2 doors and the rear panel shelf. The tweeters are powered by Hertz Mille Legend 280.3 . The tweeters are on the front dash and rear doors. So far we covered the left and the right. We then come to the center. The front center has Hertz Mille Pro 70.3 for mid and Hertz Mille Pro 28.3 for the tweeters. The rear had a little more room as it was originally equipped with a 10 inch stock pioneer subwoofer. I fit this space with the Hertz Mille Pro 165.3 mid woofer. Hertz 70.3 for mid and Hertz 28.3 for the tweeters. We are left with the sub woofers. I have a 10 inch JL audio ported subwoofer behind the rear seat in the trunk and another 10 inch ported subwoofer in the spare tire. If your’e guessing, Yes I removed the spare tire. We have roadside assistance. This car doesn’t leave the city.
So far, we have covered the amplifiers, speakers and subwoofers. Next we cover sizing and distribution. Not all are utilizing the same power. The subwoofers and mid base need more, Also if you had kept tab of speaker count and amplifier channel they dont match. So I had to drive 12 channels active and 2 channels passive. Who gets what is what we cover next. Heres the math behind it. Not so complicated. The mid range and tweeters are spec’ed at 90W RMS which matches the provided 90W RMS from the Audison AFM 8.14 DSP amplifier. The midwoofers are speced at 125 W RMS per speaker. This was paired with the companion Audison AFM6D rated at 135 W per channel for a total of 6 channels of amplification. That leaves us with the front and rear center channels. The front center has two speakers and the rear center has 3 speakers. Since we have only 2 channels of amplification left we utilize a Hertz 3 way passive crossover. For this, we went with the Hertz MPCX 3.3 for the front and rear center channels.
Thus far we have covered the brain and the muscle. Now we get to the central Nervous system that supports the conduction. Don’t mean to sound like a Doc, but I drive this analogy from the human system. It helps me to visualize the workflow. The stock speaker wires didn’t seem adequate to me to drive all this power efficiently down to the speakers. I decided to perform an open surgery here. I ran 14 AWG pure OFC copper wire to all the peripheral nodes. They all meet back to the Audison amplifier distribution. This is one area I had mixed reviews . Should you run new wires and how? It cost me dearly well over a couple of months. I would not recommend this for an install. I did this so I can build a complete demo of every detail you can think of in custom car audio fabrication. Now where were we. New speaker wires is ran to all the speakers. The central wire system doesn’t end there. All this configuration takes atleast 2000+ watts of power. The stock battery and alternator is not designed for this. Even if it were we want to isolate the car performance from pleasure. So We need a separate battery to power this. We go with a group48 battery. This battery needs a distribution box for all the amplifiers. I have designed a 2 stage distribution box. Initially 0 AWG wire from primary battery to the first distribution box. The 2 4 AWG wires run from the first distribution box to the second distribution box. From the second distribution box we have 3 sets of 8 AWG wires running to the amplifiers. We also ran 4 pairs of 16 awg power wires for smaller peripherals.
Now that we have covered the amplifiers, speakers and the battery we need to figure how to feed this on a daily basis. If we have only one battery we can depend on the cars alternator to charge it. Since we added a secondary battery it now takes us to BMS( Battery Management system). For this I added a NOCO Boost Genius 20 A dual battery charger.I connected both the batteries to the noco Genius Boost to charge the battery externally . This charger charges both the batteries and you are also able to tell the useful life left in them before another charge. The beauty of this charger is you dont have to worry about overcharging. You can play music all year long and keep it charging and not have to start your car at all. OK enough said in the introduction about BMS we shall move on to the next phase of powering all these amplifiers. Since we connected all the amplifiers and peripherals to the secondary battery they dont know when to shut off. They turn on the detection of a 12V trigger which , in this case, is available all year round. We need to connect this battery to the cars primary battery for 2 reasons. One , we can charge the secondary battery from a cars alternator and secondly we can kill the power to the amplifiers from the secondary battery by adding a trigger from the primary batteries fuse box. Since the car is already wired to turn on and off devices when it is keyed in, we tap into the same trigger for this battery. Now that we are communicating between the 2 batteries we have to be very careful. We have to add 2 solenoids and multiple fuses. We start by adding a 150 A fuse between the primary battery and secondary battery. In case of a short we kill the communication between the two batteries. First for this purpose we place this fuse close to the primary battery within 1-2 feet. Next , we add a solenoid rated at 150 Amp to make / break power connection between the two batteries. Now we add another fuse on the other end of the solenoid closer to the secondary battery. What we have achieved is connecting the 2 batteries. So far, I hope you are following with me. If you notice we still havent added a kill switch to the secondary battery. We add another solenoid – in this case I went with a 200A solenoid. This solenoid will connect the secondary battery to the amplifiers through this solenoid. This is the kill switch for the custom audio rack. As usual add a similar rated fuse before and after the solenoid to protect the batteries and devices. Solenoids are a fancy word for a switch. You provide a small current to make or break a large circuit similar to your house light/fan. The difference is it is rated for industrial strength. We power these 2 solenoids we put in place by connecting the trigger 12 v from the cars fuse box. Bam. We took care of disconnecting the power on car ignition switch. I experimented a lot with this to write in a paragraph. Now that we have thich 4 GA and 0 GA wires running between 2 batteries and the amplifiers , we need to be careful about touching any part of the positive to the car chassis. It will short out the car. Rember all the ground is terminated to the cars chassis( any unpainted body of the car).
We have a frankenstein. Now it needs a soul. For this I added a Audison BCon bluetooth streaming device to stream music fro the like of spotify, apple music , amazon music( I’m sure there are a lot more) from my phone to the audison bcon. This takes one of the peripheral 16 awg power source I spoke about earlier(remember). This disconnects our phone from the cars carplay and we connect to this bluetooth streaming device. Todays cars headunit dont just play music. We use hands free calling , chimes for backup cameras, chimes for seat belt. THis list is on and on beyond the scope here. Point being we just cant bypass all car sound. We only stream music elsewhere, since we use bluetooth 5.0 and optical fiber connection to the amplifiers. Your phone can connect to multiple bluetooth devices at once. We connect to the car for phone,nav etc . We connect to audison bcon for music streaming. In the bluetooth world they have 2 specs . One is the HFP( hands free profile). This is what we use to connect our phone calls and phone maps to the car. We have another profile( forgot at the time of this writing what it is called) for music. We use this profile for the phone to pair to the audison bcon. I split open the factory speaker in and out wires . First lets cover the out since its easy. Remember I ran new 14 AWG OFC copper wires for the new speakers . So the factory out is pretty much labelled and capped. Except the center channel. I found it cumbersome to run new wires for the front center. So i retain the front center( mid and tweeter to OOB). We move on to the other end of the splice. We have 16 pairs of amplified high signal coming from the factory amp. These wires contain the data of all factory radio audio, chimes and phone calls. I connected this to the Audiocontrol LC8i speaker level inputs. So this takes 8 inputs. Remember, I have 16 outs from the factory amplifier. I carefully select the channels I want to feed to the LC8i. It should encompass a full bandwidth (from low to high and Left and right). I use 4 for the left and 4 for the right. Out of the 4 that I split for the left and right, I split it it to twitter, mid trange and mid bass. Repeat this for the right.
Now we move on to the sub woofers. We have 2 moved ported 10 inch subwoofers. We power these with the Audison forza AFM1D monoblock amplifier. We have a bit of a situation here. I have already utilized all the 14 channels of DSP provided by the Audison AFM8.14 for the speakers discussed earlier. Luckily the Audison BCon has 2 simultaneous outputs- optic fiber and RCA . I was able to use a RCA to pigtail and extract the music output from the bcon streamer out to the audison AFM1D. I placed an audiocontrol LC2i LOC between the bcon and the Audison AFM1D monoblock. Technically you can feed toe bcon speaker level output directly to the Audison AFM1D but I have a audiocontrol ACR1 dash control volume knob wired previously. I wanted to make use of this. Since the master volume control for the Audison M8.14 doesnt talk to the Audison AFM1D monoblock. The subwoofer volume gain control is now under the mini glove box under the steering wheel. I also have a similar Audiocontrol ACR3 volume knob stacked for the Audiocontrol LC8i for the factory radio volume control.
Let’s do a quick recap of what we have so far. We have covered the Amplifiers, speakers, battery management system, and Subwoofers.
Now its time to power on everything and do a light and sound check. Everything was blinking and sounding at the right places(after 100 corrections and tweaks).
All sounds good from the Audison BCon streamer. However, I didn’t have any sound from my factory sound. For a couple of months, I was driving without my backup sensors beeping or my phone calls on my new system. Here’s what I learnt. When you add aftermarket speakers and an Audiocontrol LOC, the factory system does not detect factory speakers in its output, so it shuts down the input signal; hence, no sound. To fix this, you have to add 4 load generator resistors, especially for high-end systems like the Maserati Quattroporte. This tricks the factory system to think there are speakers attached by showing load. There is much more it does. I will not detail here. That took care of the issue of factory sound.
At this time light and sound checked out. Whats left is the beauty to place this and add a touch of detail. So I started the Fabrication process of the trunk.

This is where the name of my company was formed. Lightnsoundfab.com. There’s a story behind the name.
Let the fab begin. I will quickly shut this topic down for now and go to the end. It will take months to talk about this.
I would like to thank some incredible people with great knowledge on caraudiofabrication. I want to thank Mark from CaraudioFabrication. His videos have inspired me and given me a direction on how to go about this.
At this point, I have a mobile showroom where you can experience the music and talk over coffee about what you want to do.